Redesigning the analog clock
I made myself a clock. Here's the original Google+ post: https://plus.google.com/110214848059767

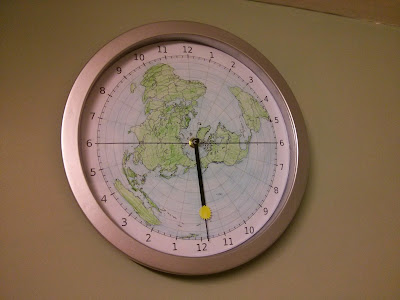
Since then my daughter and I have decorated the clock a bit more. She colored in the countries green and I fixed a Sun on the hour hand above the equator:
I promised some details about how to make your own. It's really very simple indeed, and cheap.
1) Buy a 24-hour clock. I bought this one from Amazon in the UK. It was less than £20.

Make sure you get one that has an hour hand that goes round once per day!
Alternatively you can buy a 24-hour clock mechanism and make your own face plate. Probably best to buy the hands at the same time so you can be sure they will fit.
Here's an EBay link to lots of different 24-hour clocks and mechanisms: http://www.ebay.com/bhp/24-hour-clock
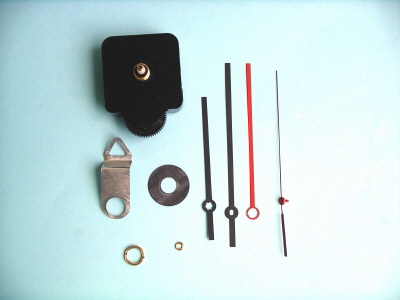
2) Take your clock apart. Mine had crosshead screws on the back so it was easy. Then pull off the hands. Every clock mechanism I've come across has hands that fit by friction, so you can take them off and put them back on again by hand.
3) Extend the hour hand. This is optional. Typically the hour hand is shorter and doesn't reach to the edge of the circle, which affects our clock design where we need a bit more precision from the read-out, since we only have one hand.
There are lots of options here. I snipped off the second hand and glued it to the underside of the hour hand. It did make it look like there were two hands with one on top of the other but later the sun covered it up, as you can see in the images above.
Possibly a better option is to replace the pointer completely. Keep the center bit of course because you'll need it to push back onto the spindle. Fashion a pointer from a bamboo skewer or something like that and glue it on.
Optionally you can add a little sun sticker to make it more obvious what the clock is showing. I just made one from a little bit of card and glued it on. I would suggest sticking it over the equator circle, since that is the average latitude of the sun. (By a happy coincidence this also covered up the join in my two-part hour hand.)
4) Snip the second hand and replace the center cap. With my clock the central spindle looked a bit bare with just the hour hand. Often the smallest hand has a decorative dome cap, which you can re-use. It is missing in the top image, if you can see. Just push it back on after removing the second hand pointer.
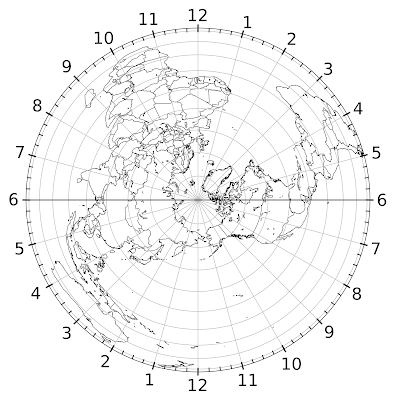
5) Prepare a new face image. If the clock is for GMT/UTC then you're welcome to use my image. I've put a high-res version here: (not this 400 pixel thumbnail, click through for the 4000 pixel image)
Otherwise you can use GIMP to rotate this image:
and overlay it with this image of just the numbers and marks:
To rotate in GIMP, use Layer > Transform > Arbitrary Rotation...
To overlay in GIMP, use File > Import as Layers... to open the two images, then change the Mode in the Layers dialog to Darken Only. Use the Move tool if the two layers aren't aligned correctly.
When rotating, each hour is 15 degrees. It's not critical that the sun is in exactly the right place (we're not allowing for daylight saving time for example) but try to get your location to be at the top, because noon is when the sun is highest in the sky. Let me know if you need me to make the face image for you.
If you don't want the horizon line then I've put a version up without it, in the same album.
You can use a different map image of course. As long as it's a polar projection of the North pole then it will work fine. I made mine using NASA G.Projector: http://www.giss.nasa.gov/tools/gprojecto
If you have a color printer then now is a good time to add some color to the image.
6) Print the image. Specify the print size by the diameter of your clock (mine was 10.5 inches). I had to print mine in two halves because the clock was larger than A4. Cut into a circle and cut a hole out for the spindle in the center. Check it fits on the clock face.
If you have a black and white printer like me then now is a good time to decorate your image. I asked to borrow my daughter's coloring pencils. Later she helped me color in with a green crayon which worked well too.
Now glue the image down. Be careful to line it up so that the spindle is in the center and the noon marker is at the top.
7) Put the clock back together. Enjoy your new improved analog clock. Please let me know if you end up making your own clock, and send me a photo.
Tools used: crosshead screwdriver, pliers with metal scissors for snipping the hands, glue for extending the hour hand (I used Araldite), printer, colored pencil/crayon, scissors, image editing software (I used GIMP), glue for the printout (I used Pritt Stick).
Discussion:
Here's a fantastic blog site full of designs for 24-hour clocks: http://24hourtime.blogspot.ie/
There's a long history of 24-hour clocks. What motivated me was that the clock obviously evolved from sundials and yet somehow we lost the connection somewhere and made clocks into 12-hour rotations. And the minute and second hands need a different scale completely, which makes it unnecessarily hard to teach kids to read the time from a traditional analog clock.
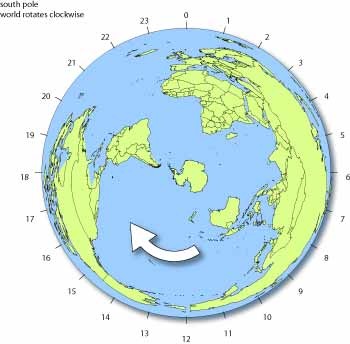
If you're in the Southern hemisphere then you might be feeling hard done by. But fear not. On this page there is an idea for a Southern hemisphere rotating map clock: http://24hourtime.blogspot.ie/p/design.h
To make that, you'd need to print out the image onto a stiff piece of card and glue the whole thing to the hour hand. Then with the numbers fixed on the clock behind the map will rotate round. You can put an image of the Sun at 12 noon to show which half is daylit.
Here's a high-res image of the Southern hemisphere projection, if you want to use it:
You would need some mark on the edge of the map to show the exact time point, like this:
A nice side-effect of using the Southern hemisphere is that the time in different places can be read off directly. When it is 9am in Australia you will see immediately that it is 2pm in Alaska. Let me know if you make this sort of clock.
Analog clocks have always annoyed me, so I decided to make my own. This is the logical solution I think. There's only one hand, which moves round once a day and shows where the sun is on the map. In the photo it is nearly 10pm in the UK so the sun is over the Alaska timezone. The 6am-6pm line is your horizon, so the top half is your daytime.
This one is for GMT/UTC - you'd need to rotate the map for different timezones, to put your location at the top under the noon marker.
Since then my daughter and I have decorated the clock a bit more. She colored in the countries green and I fixed a Sun on the hour hand above the equator:
I promised some details about how to make your own. It's really very simple indeed, and cheap.
1) Buy a 24-hour clock. I bought this one from Amazon in the UK. It was less than £20.
Make sure you get one that has an hour hand that goes round once per day!
Alternatively you can buy a 24-hour clock mechanism and make your own face plate. Probably best to buy the hands at the same time so you can be sure they will fit.
Here's an EBay link to lots of different 24-hour clocks and mechanisms: http://www.ebay.com/bhp/24-hour-clock
2) Take your clock apart. Mine had crosshead screws on the back so it was easy. Then pull off the hands. Every clock mechanism I've come across has hands that fit by friction, so you can take them off and put them back on again by hand.
3) Extend the hour hand. This is optional. Typically the hour hand is shorter and doesn't reach to the edge of the circle, which affects our clock design where we need a bit more precision from the read-out, since we only have one hand.
There are lots of options here. I snipped off the second hand and glued it to the underside of the hour hand. It did make it look like there were two hands with one on top of the other but later the sun covered it up, as you can see in the images above.
Possibly a better option is to replace the pointer completely. Keep the center bit of course because you'll need it to push back onto the spindle. Fashion a pointer from a bamboo skewer or something like that and glue it on.
Optionally you can add a little sun sticker to make it more obvious what the clock is showing. I just made one from a little bit of card and glued it on. I would suggest sticking it over the equator circle, since that is the average latitude of the sun. (By a happy coincidence this also covered up the join in my two-part hour hand.)
4) Snip the second hand and replace the center cap. With my clock the central spindle looked a bit bare with just the hour hand. Often the smallest hand has a decorative dome cap, which you can re-use. It is missing in the top image, if you can see. Just push it back on after removing the second hand pointer.
5) Prepare a new face image. If the clock is for GMT/UTC then you're welcome to use my image. I've put a high-res version here: (not this 400 pixel thumbnail, click through for the 4000 pixel image)
 |
| From Clock |
Otherwise you can use GIMP to rotate this image:
 |
| From Clock |
and overlay it with this image of just the numbers and marks:
 |
| From Clock |
To rotate in GIMP, use Layer > Transform > Arbitrary Rotation...
To overlay in GIMP, use File > Import as Layers... to open the two images, then change the Mode in the Layers dialog to Darken Only. Use the Move tool if the two layers aren't aligned correctly.
When rotating, each hour is 15 degrees. It's not critical that the sun is in exactly the right place (we're not allowing for daylight saving time for example) but try to get your location to be at the top, because noon is when the sun is highest in the sky. Let me know if you need me to make the face image for you.
If you don't want the horizon line then I've put a version up without it, in the same album.
You can use a different map image of course. As long as it's a polar projection of the North pole then it will work fine. I made mine using NASA G.Projector: http://www.giss.nasa.gov/tools/gprojecto
If you have a color printer then now is a good time to add some color to the image.
6) Print the image. Specify the print size by the diameter of your clock (mine was 10.5 inches). I had to print mine in two halves because the clock was larger than A4. Cut into a circle and cut a hole out for the spindle in the center. Check it fits on the clock face.
If you have a black and white printer like me then now is a good time to decorate your image. I asked to borrow my daughter's coloring pencils. Later she helped me color in with a green crayon which worked well too.
Now glue the image down. Be careful to line it up so that the spindle is in the center and the noon marker is at the top.
7) Put the clock back together. Enjoy your new improved analog clock. Please let me know if you end up making your own clock, and send me a photo.
Tools used: crosshead screwdriver, pliers with metal scissors for snipping the hands, glue for extending the hour hand (I used Araldite), printer, colored pencil/crayon, scissors, image editing software (I used GIMP), glue for the printout (I used Pritt Stick).
Discussion:
Here's a fantastic blog site full of designs for 24-hour clocks: http://24hourtime.blogspot.ie/
There's a long history of 24-hour clocks. What motivated me was that the clock obviously evolved from sundials and yet somehow we lost the connection somewhere and made clocks into 12-hour rotations. And the minute and second hands need a different scale completely, which makes it unnecessarily hard to teach kids to read the time from a traditional analog clock.
If you're in the Southern hemisphere then you might be feeling hard done by. But fear not. On this page there is an idea for a Southern hemisphere rotating map clock: http://24hourtime.blogspot.ie/p/design.h
To make that, you'd need to print out the image onto a stiff piece of card and glue the whole thing to the hour hand. Then with the numbers fixed on the clock behind the map will rotate round. You can put an image of the Sun at 12 noon to show which half is daylit.
Here's a high-res image of the Southern hemisphere projection, if you want to use it:
 |
| From Clock |
You would need some mark on the edge of the map to show the exact time point, like this:
 |
| From Clock |
A nice side-effect of using the Southern hemisphere is that the time in different places can be read off directly. When it is 9am in Australia you will see immediately that it is 2pm in Alaska. Let me know if you make this sort of clock.
This post was originally on LiveJournal.